In this article, we go over setting up a site-to-site VPN between a Check Point Gateway and a Sophos UTM Home Edition device.
Check Point is the leader in Next-Generation Firewalls. While there can be a bit of a (steep) learning curve with their products, they are leading edge, and very powerful. The biggest downside to Check Point is cost. They are quite expensive, both in terms of products and support. But you get what you pay for, and when you pay top dollar, you really do get top product. But what about the regular Joe, home/small business owner who doesn't have that kind of cash? Or what about small, non/not-for-profit organizations?
Enter Sophos UTM Home Edition:
"Our Free Home Use Firewall is a fully equipped software version of the Sophos UTM firewall, available at no cost for home users – no strings attached. It features full Network, Web, Mail and Web Application Security with VPN functionality and protects up to 50 IP addresses."
Perfect! This is exactly what many of these places need. 50 IP addresses translates to 50 individual devices connected to the internet. There are few homes and small organizations that would get to this limit.
But this article isn't about praising the many virtues of the Sophos UTM Home Edition... It's about setting up a VPN to a Check Point device.
At work, I have access to all the Check POint software I could want. In the end, without proper licenses, they are rather useless. But we have access to some internal licenses to set things up in labs and such. Being a Security Engineer, VPNs is one of the more common problems I work on. So we'll go over setting up this VPN, both on the Check Point and Sophos side of things.
We're not going to go over installing any software... We'll assume that you have both devices installed and ready to go. We'll go over creating the proper objects and configuring the VPN on both sides.
Here's the sample topology I'm working with:
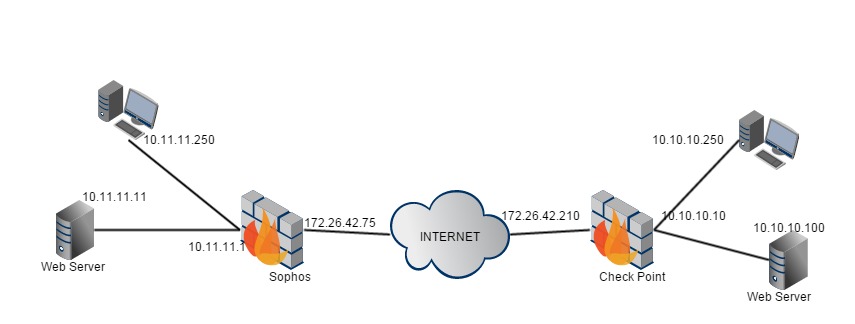
First, we'll start on the Check Point side.
In SmartDashboard, create an Interoperable Device for the Sophos device.
1. In SmartDashboard, right-click the "Network Objects", and select "Interoperable Device" (If you have not created an Interoperable Device yet, you may need to go "Others" -> "Interoperable Device").
2. Fill in the following details:
Name - Call it what you will, we'll just call it "Sophos".
IPv4 Address - We are working with just IPv4 here, not v6. Enter the Sophos' External IP Address (Public IP). In our example I'll use 172.26.42.75
3. On the right-hand column, select "IPSec VPN", then "Link Selection". Ensure that "Main address" is selected here.
4. On the right-hand column, select "Topology". In the "VPN Domain", select "Manually defined", the "..." button, "New" button, then "Network..."
5. Fill in the following details:
Name - Call it what you will, we'll just call it "Sophos_Enc_Dom" (Encryption Domain).
IPv4 Network Address & Net Mask - Enter the Network and Net Mask of the resources you wish to access that are behind the Sophos device. Here, we shall use 10.11.11.0 255.255.255.0
NOTE (Edited 2015-11-13): If you already have an encryption domain defined here, and you cannot alter it due to other VPNs, you will need to follow the steps laid out in Checkpoint's sk62590: "Configuring the Subnet Per Range for Quick Mode to enhance interoperability with 3rd-party VPN devices"
You will need to edit the appropriate "user.def' file (sk98239: "Location of 'user.def' files on Security Management Server"), and add the following (note the comma between lines, but not the last line):
subnet_for_range_and_peer = {
<peergw_ip, first_ip_in_range, last_ip_in_range; subnet_mask>,
<peergw_ip, first_ip_in_range, last_ip_in_range; subnet_mask>
};
Using our topology, it would look like:
subnet_for_range_and_peer = {
<172.26.42.75, 10.11.11.0, 10.11.11.255; 255.255.255.0>
};
6. Click OK on all boxes that are open until you get back to SmartDashboard.
7. Make sure you have the Check Point side Encryption Domain set.
Open the Gateway Object properties -> Topology
In VPN Domain, select Manually Defined
Either select an existing Group/Network, or create one
I am creating a network with the following details:
Name - DMZ
IPv4 Network Address & Net Mask - 10.10.10.0 255.255.255.0
Click OK, get back to SmartDashboard
8. Now that the objects are created, let's go ahead and set up the VPN Community. Up along the top, select the "IPSec VPN" tab.
9. Click the "New.." button -> "Star Community". Fill in the following details:
Name: We'll call it "Sophos_VPN"
10. On the right-hand side, select "Center Gateways".
Click "Add...", and select your central Check Point Gateway.
11. On the right-hand side, select "Satellite Gateways".
Click "Add...", and select your Sophos gateway
12. On the right-hand side, select "Advanced Settings" -> "Shared Secret"
Check the box "Use only Shared Secret for all External members"
Select the Sophos gateway, click the button "Edit..."
Enter Secret: P@ssword (Check Point recommends you use a secret at least 20 characters long, but this is just an example)
13. On the right-hand side, select "Advanced Settings" -> "Advanced VPN Properties"
Check the box "Disable NAT inside the VPN community"
14. Click OK, we're done here.
15. Now, we need Firewall rules to allow the traffic. Click the Firewall tab.
16. Create a new rule with the following:
Source: Sophos_Enc_Dom, DMZ
Destination: Sophos_Enc_Dom, DMZ
VPN: Sophos_VPN
Service: Any
Action: Accept
Track: Log
17. Save and push policy.
And this takes care of the Check Point side of things.
On to the Sophos side:
18. Open the Sophos WebUI.
19. On the left-hand side, select "Definitions & Users" -> "Network Definitions".
20. Click the button "New Network Definition...", fill in the following:
Name: CheckPointGW
Type: Host
IPv4 Address: 172.26.42.210
Click the "Save" button
21. On the left-hand side, select "Site-to-Site VPN" -> "IPsec".
22. In the IPsec section, click the "Remote Gateways" tab. We first need to define the remote Check Point Gateway.
23. Click the button "New Remote Gateway...", fill in the following details:
Name: CheckPoint
Gateway: Click the little folder button, and select your CheckPointGW object from the list, drag it to this section
Key & Repeat: For this example, we will keep it simple... "P@ssw0rd"
Remote Networks: Click the little green '+' (plus symbol). Fill in the following details:
Name: CheckPointEncDom
Type: Network
IPv4 Address: 10.10.10.0
Netmask: /24
Click the "Save" button
Click the "Save" button
24. Up towards the top, select "Policies". Unlike Firewall policies, this has nothing to do with traffic. These are Encryption policies. Here, we will need to make sure that both sides match up, 100%.
25. Clik the button "New IPsec Policy...", fill in the following details:
Name: CPEncyption
IKE encryption algorithm: AES-256
IKE authentication algorithm: SHA1
IKE SA lifetime: 1440
IKE DH group: Group 2
IPsec encryption algorithm: AES-128
IPsec authentication algorithm: SHA1
IPsec SA lifetime: 3600
IPsec PFS group: None
NOTE: These settings correspond to the default Check Point settings. Change them as/if necessary.
26. Now, up along the top, select the "Connections" tab.
27. Clik the button "New IPsec Connection...", fill in the following details:
Name: Check Point VPN
Remote Gateway: CheckPoint
Local Interface: External Interface
Policy: CPEncryption
Local Networks: Internal Network object represnting 10.11.11.0/24
"Automatic Firewall Rules", unchecked
Click the "Save..." button
28. Now for the firewall rules to allow the traffic. On the left-hand side, select "Network Protection" -> "Firewall".
29. Clik the button "New Rule...", fill in the following details:
Sources: CheckPointEncDom, Internal 10.11.11.0/24 network
Services: Any
Destinations: CheckPointEncDom, Internal 10.11.11.0/24 network
Action: Allow
Click the "Save" button
30. Click the "Status" switch to Enable the rule.
31. DONE!
Now, to really test the VPN, from the 10.x.x.250 Client PCs, just try browsing to http://10.10.10.100 or http://10.11.11.11 (try to access the opposite side). If you get the Web Server's Web Page, the VPN is working!
Now, this is my first larger scale How-To like this, so if there is anything at all unclear, please let me know in the comments so I can get it fixed.
Comments
In a lot of VPN configurations, I use subnet_for_range_and_peer in user.def.* file. Check Point sometimes uses bigger subnets so traffic from CheckPoint protected networks to other subnets routed through VPN fails ..
Check Point should define tunnels as pair of subnets ..shouldn't be that hard to update their GUI to be complete / so they avoid configuration in GUI+manual files
You'll note that the 2 sides of the VPN have similar, though different subnets: 1 side is 10.10.10.0/24, the other is 10.11.11.0/24
You have a very good point on the subnet_for_peer_and_range in the user.def file. Since the lab setup I used was the entire topology I put up at the start of the article, I had no need to have those edits as there were no other VPNs to make the Check Point side start to supernet the encryption domain. I agree that the GUI should be updated to reflect this. If you, and anyone else agree, fill out a Request For Enhancement (RFE) here:
www.checkpoint.com/rfe/rfe.htm
Now I know what you're going to say... "That webform just leads to black hole... Nothing will ever be done." And perhaps that's true, to a degree. At Check Point, we take those requests far more seriously than anyone expects. If there is enough of a business need/desire/want for a particular Enhancement, believe me, it WILL be done. So if enough people ask for the ability to set Encryption Domains per VPN Community and/or User, than it WILL eventually be done. We just need enough Requests to make it happen.
(Oi that was a bit more of a rant than I intended,,,)