Now we're into the hardware part. Comically enough, this is likely the easiest part of the wholoe deal. This is a fabulous way to get your hands dirty with some basic hardware "hacking" if you have never done so before.
First, you need an "RS232 to TTL Converter", or a "DB9 Level Shifter". You can pick one up at SparkFun for a not-too-ungodly-price. But myself, I picked one up on eBay like this for a much cheaper price. The one I got even came with a cable with the appropriate connectors. It came from China so it took FOREVER to get here, but it was much MUCH cheaper.
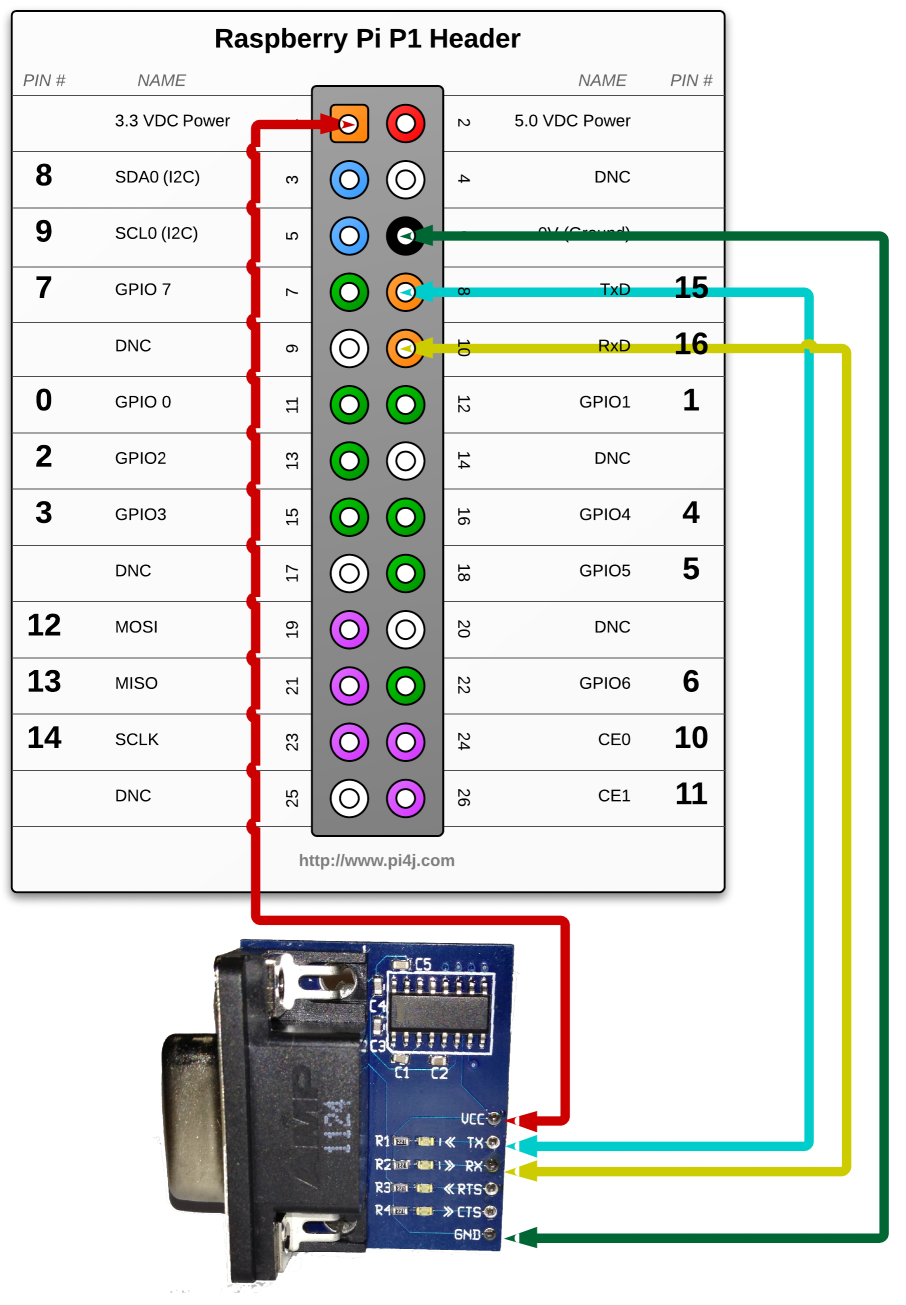
Once you have it, connect the DB9 level shifter as per the image below:
Next, connect the serial port to a device (I tested with and IP260 in my lab).
You can now connect with the following command:
minicom -b 9600 -D /dev/ttyAMA0
or, once the aliases have been changed:
serial
The last thing I wanted to do was to create a secure VNC Connection. This is the last application that we installed earlier to be configured. A VNC Connection would allow me to connect to the Pi's desktop, and open GUI applications like a Web Browser. Granted, the initial reason for this setup was to simply get a Serial connection, which has been accomplished. But on the overall scale, I needed to be able to configure the device I was connected to via Serial. In my case, this was a Nokia IP260 (ancient by now). Once the initial installs have been completed via the serial connection, I then need some kind of Web Browser to be able to then finish configuring the device. Fortunately, the built-in Ethernet adapter on the Pi is the PERFECT solution for this. In the end, this would give me a Pi that I can (theoritically) send into any lab, and directly connect via both serial AND ethernet.
By default, TightVNC does not encrypt the VNC connection. Since I'm a Security Engineer, we can't have that... We need to secure it somehow. I am sure there are other ways of doing this, and if you know of one, please put it in the comments. In short though, I was not able to find a way to encrypt the VNC connection itself. So rather than keep trying to beat THAT dea horse, I decided to use the SSH session as the encryption, and tunnel the VNC connection through that. Here's how it's done:
On the Pi, run the following command:
vncserver -localhost :1
or, once the aliases have been changed:vnc
And that is all to be done on the Pi.
The next part needs to be done on the Client PC you are connecting to the Pi with. Since my Corporate run Windows (ewww...), I needed to set this up with that. For the SSH Session, I used the most popular SSH Client, PuTTY; for the VNC Session, I used the freely available VNCViewer. Here's the configuration changes needed to make this work.
In PuTTY, on the right-hand side, go to Connection -> SSH -> Tunnels
Fill in the following details:
Source Port: 5901
Destination: localhost:5901
Click the Add button. Now, connect to the Pi with a new SSH session, and run the VNC command noted above.
Now, open VNCViewer (KEEP PUTTY OPEN), and connect to 127.0.0.1:1 . Use the password you configured when you ran the tightvncserver command, and voila, you are connected!
Lastly, here is how to add the command aliases to make life a little easier.
On the Pi, run the following command:
sudo nano ~/.bash_aliases
Add the following lines:
alias serial='minicom -b 9600 -D /dev/ttyAMA0'
alias vnc='vncserver -localhost :1'
Ctrl+X to exit, press y and enter to save the file. The command aliases will only take effect on the next boot.
And there you have it. A nice Raspberry Pi, ready to be a Serial client. Please use the comments and let me know what you think!
Enjoy!